Foil printing is a speciality printing process which uses heat, pressure and metallic paper (foil). This is used to create different shiny designs and graphics on various materials.
Foil sticks to toner from a Laser printer and will not stick to work printed from an Inkjet printer. Click the link below if you are unsure how to print
The Over-printing Technique
Important Note About Using Inkjet and Laser Printers Together for Foiling
When creating a foiled design using both inkjet and laser printers, it's important to understand how registration (alignment) works.
In this technique, you might:
Print parts of your design with an inkjet printer (these areas will not foil), and then
Print the foil elements with a laser printer on top of the same sheet (these areas will foil).
However, because you're running the same piece of paper through two different printers, the alignment between the two prints may not be perfect. Each printer feeds paper slightly differently, so your design can shift by a few millimetres. This is called a registration issue.
If your design allows for some flexibility (e.g. elements don’t need to align precisely — up to 5mm tolerance), this method can work well. But if your inkjet and laser elements need to line up exactly, this process will not give you perfect results, and you may be disappointed with the outcome.
In short: Only use this dual-printing method if precise alignment is not critical for your design.
•
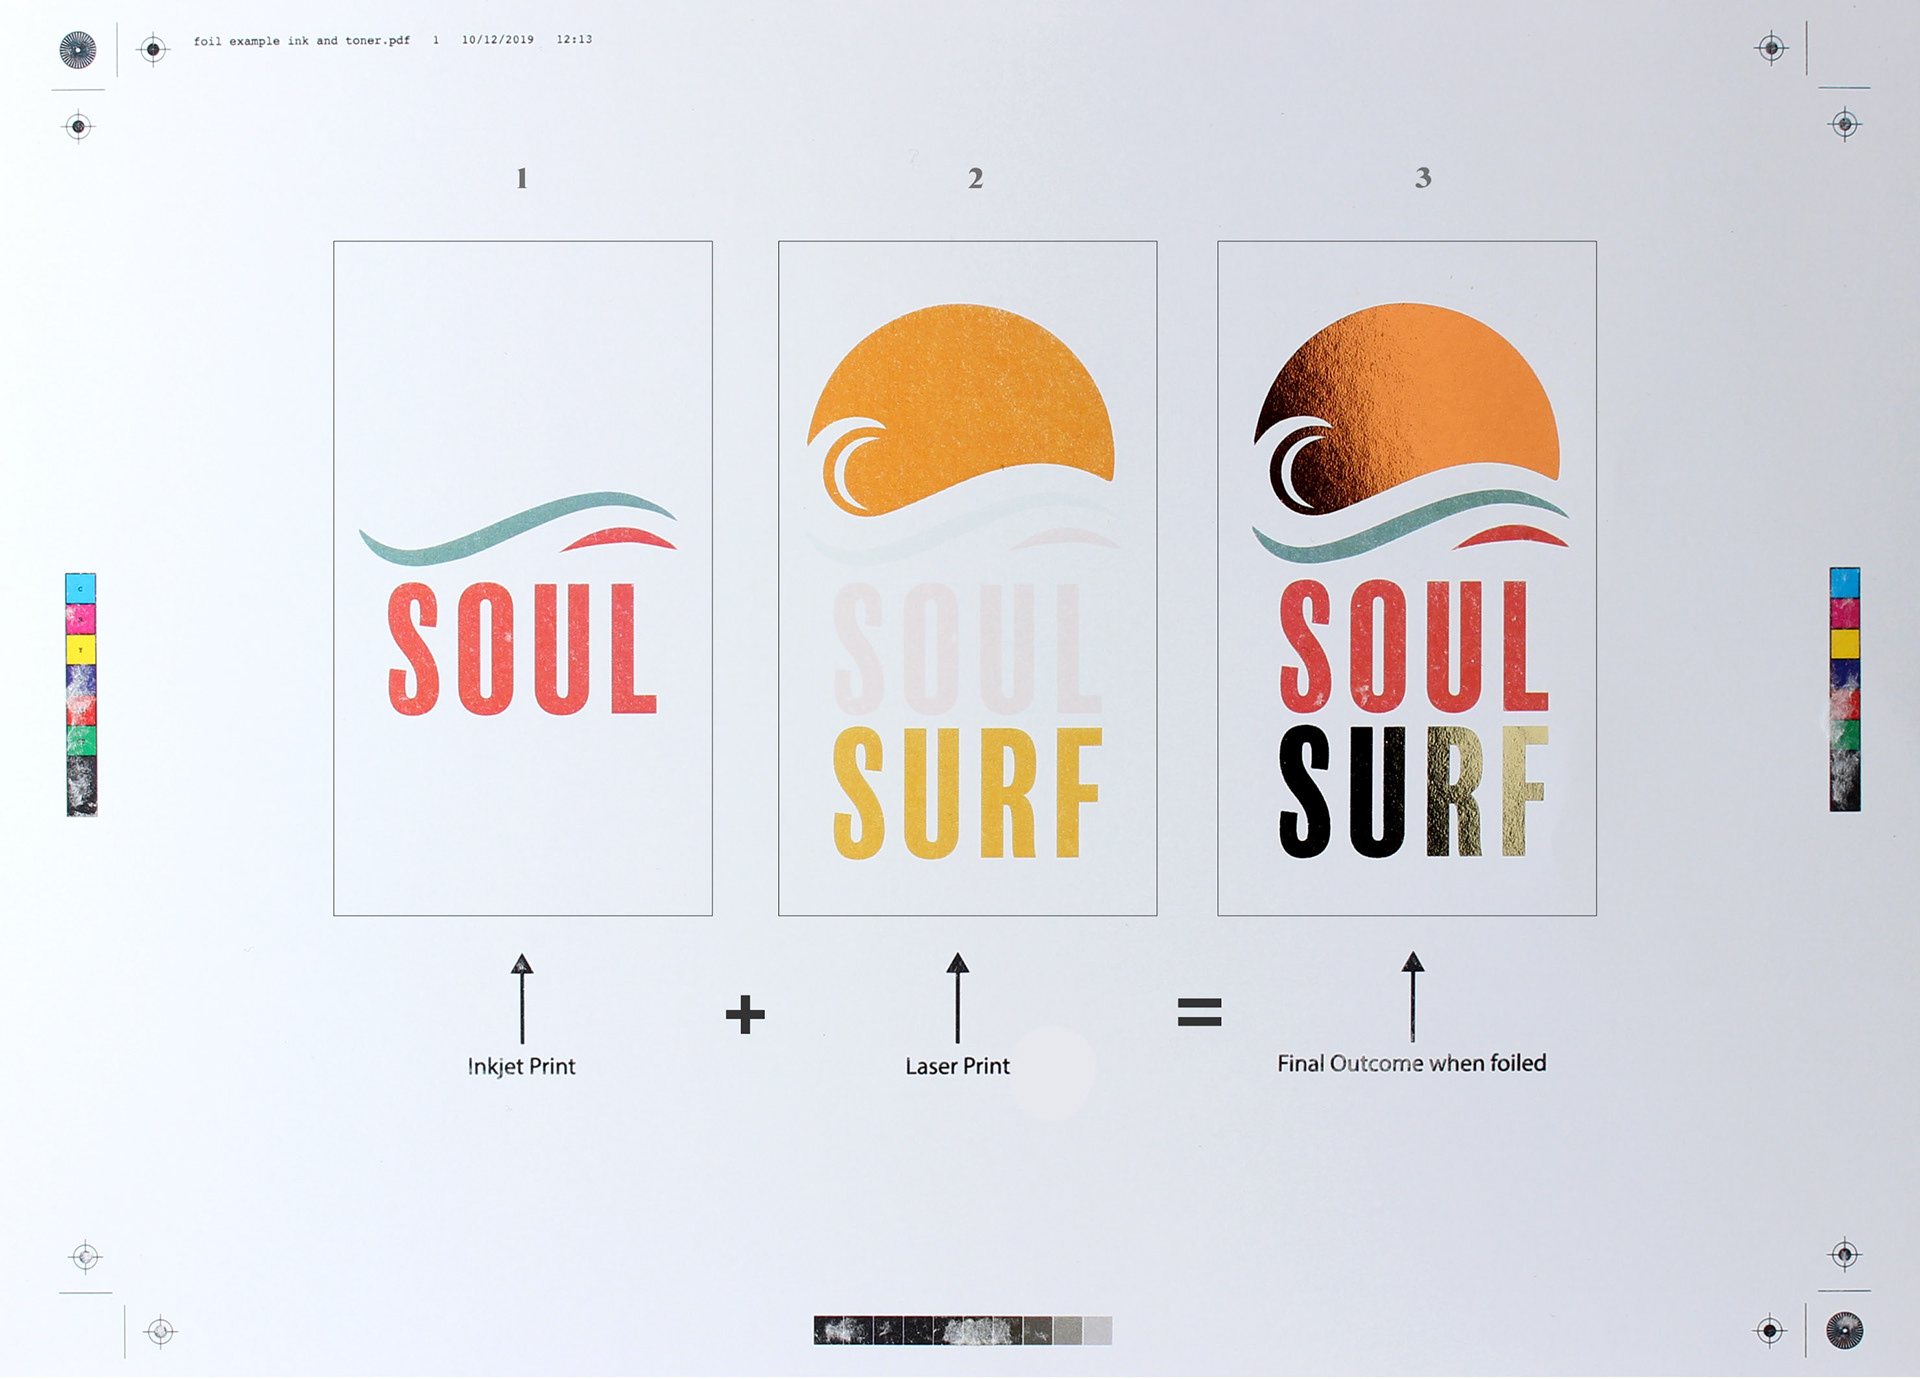
If you only require part of your image to be foiled, you may need to use 2 types of printers. Firstly, for the part you don't want foiled you would need printing on an Inkjet Printer (foil will not stick to ink). Secondly, you would then need to print over that inkjet printed artwork using a Laser Printer (laser printers use toner and not ink, foil will only stick to toner).
This process requires 2 separate designs.1 for the inkjet printer and one for a laser printer) An example of this would be wanting foiled text, but on top of an un-foiled background image. Or just wanting certain elements of your design to be foiled.
You can use the 'inkjet' printers for the first stage of this technique (the part you don’t want foil to stick to). Access the Self Printing Guide here, or for more printing options see the Printing Service page here.
Once printed on an inkjet, you can now use a laser printer to print the second stage of your design on top (the part you wish to foil). This will require you to load your paper and print from the ‘manual feed tray’ learn how here.
See Example below

Tips
The maximum artwork you are able to foil is SRA3 - Any paper larger than this can not be printed on a laser printer, therefore can not be foiled.
•
Make sure your foiling wallet is clean. You can use tissue or even scrunched up paper to give the inside a quick wipe down.
•
Creases on the foiling wallets can transfer onto your foil, these can be smoothed by passing the wallet through the foiler before placing your artwork inside.
•
Foiling tends to work better on smoother paper. Using paper with texture can stop the foil sticking to your design.
•
Although Foil sticks to black images better than coloured prints (as the printer puts down more toner) If you were foiling gold you may want to try foiling over a dark yellow colour rather than black. This means that any gaps in the foil or foil that rubs off will not reveal black, but a less blatant gold/yellow colour.
•
Scrunching the foil up before placing onto your artwork and foiling can generate an interesting texture. This can then be overlayed with a 2nd colour foil resulting in a dual tone foil.
•
After Printing - To print directly on-top of your foil or add an un-foiled element to your design, a second pass through the Laser Printer would be required. If you plan try this technique, please give your foiled artwork a second pass through the foiler (in the brown foiling wallet) before you After Print to ensure your foil is fully stuck on. After Printing can be done using the 'Manual Feed' Tray on any Laser Printer.
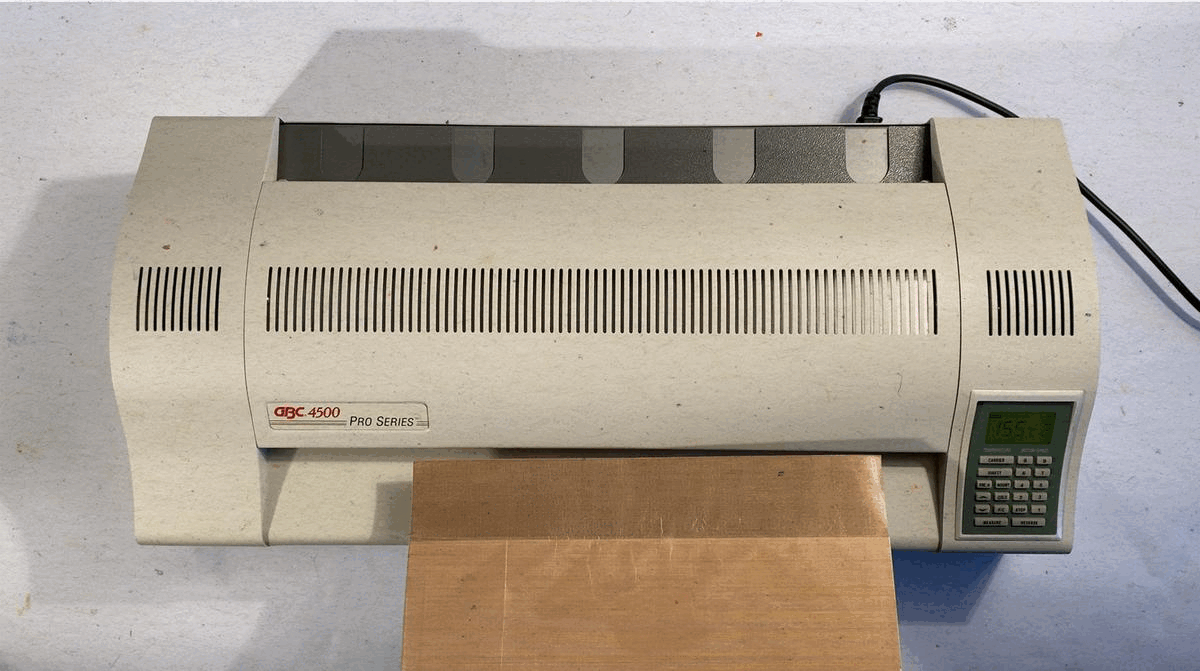
Step 1 - Turning on the Foiling Machine
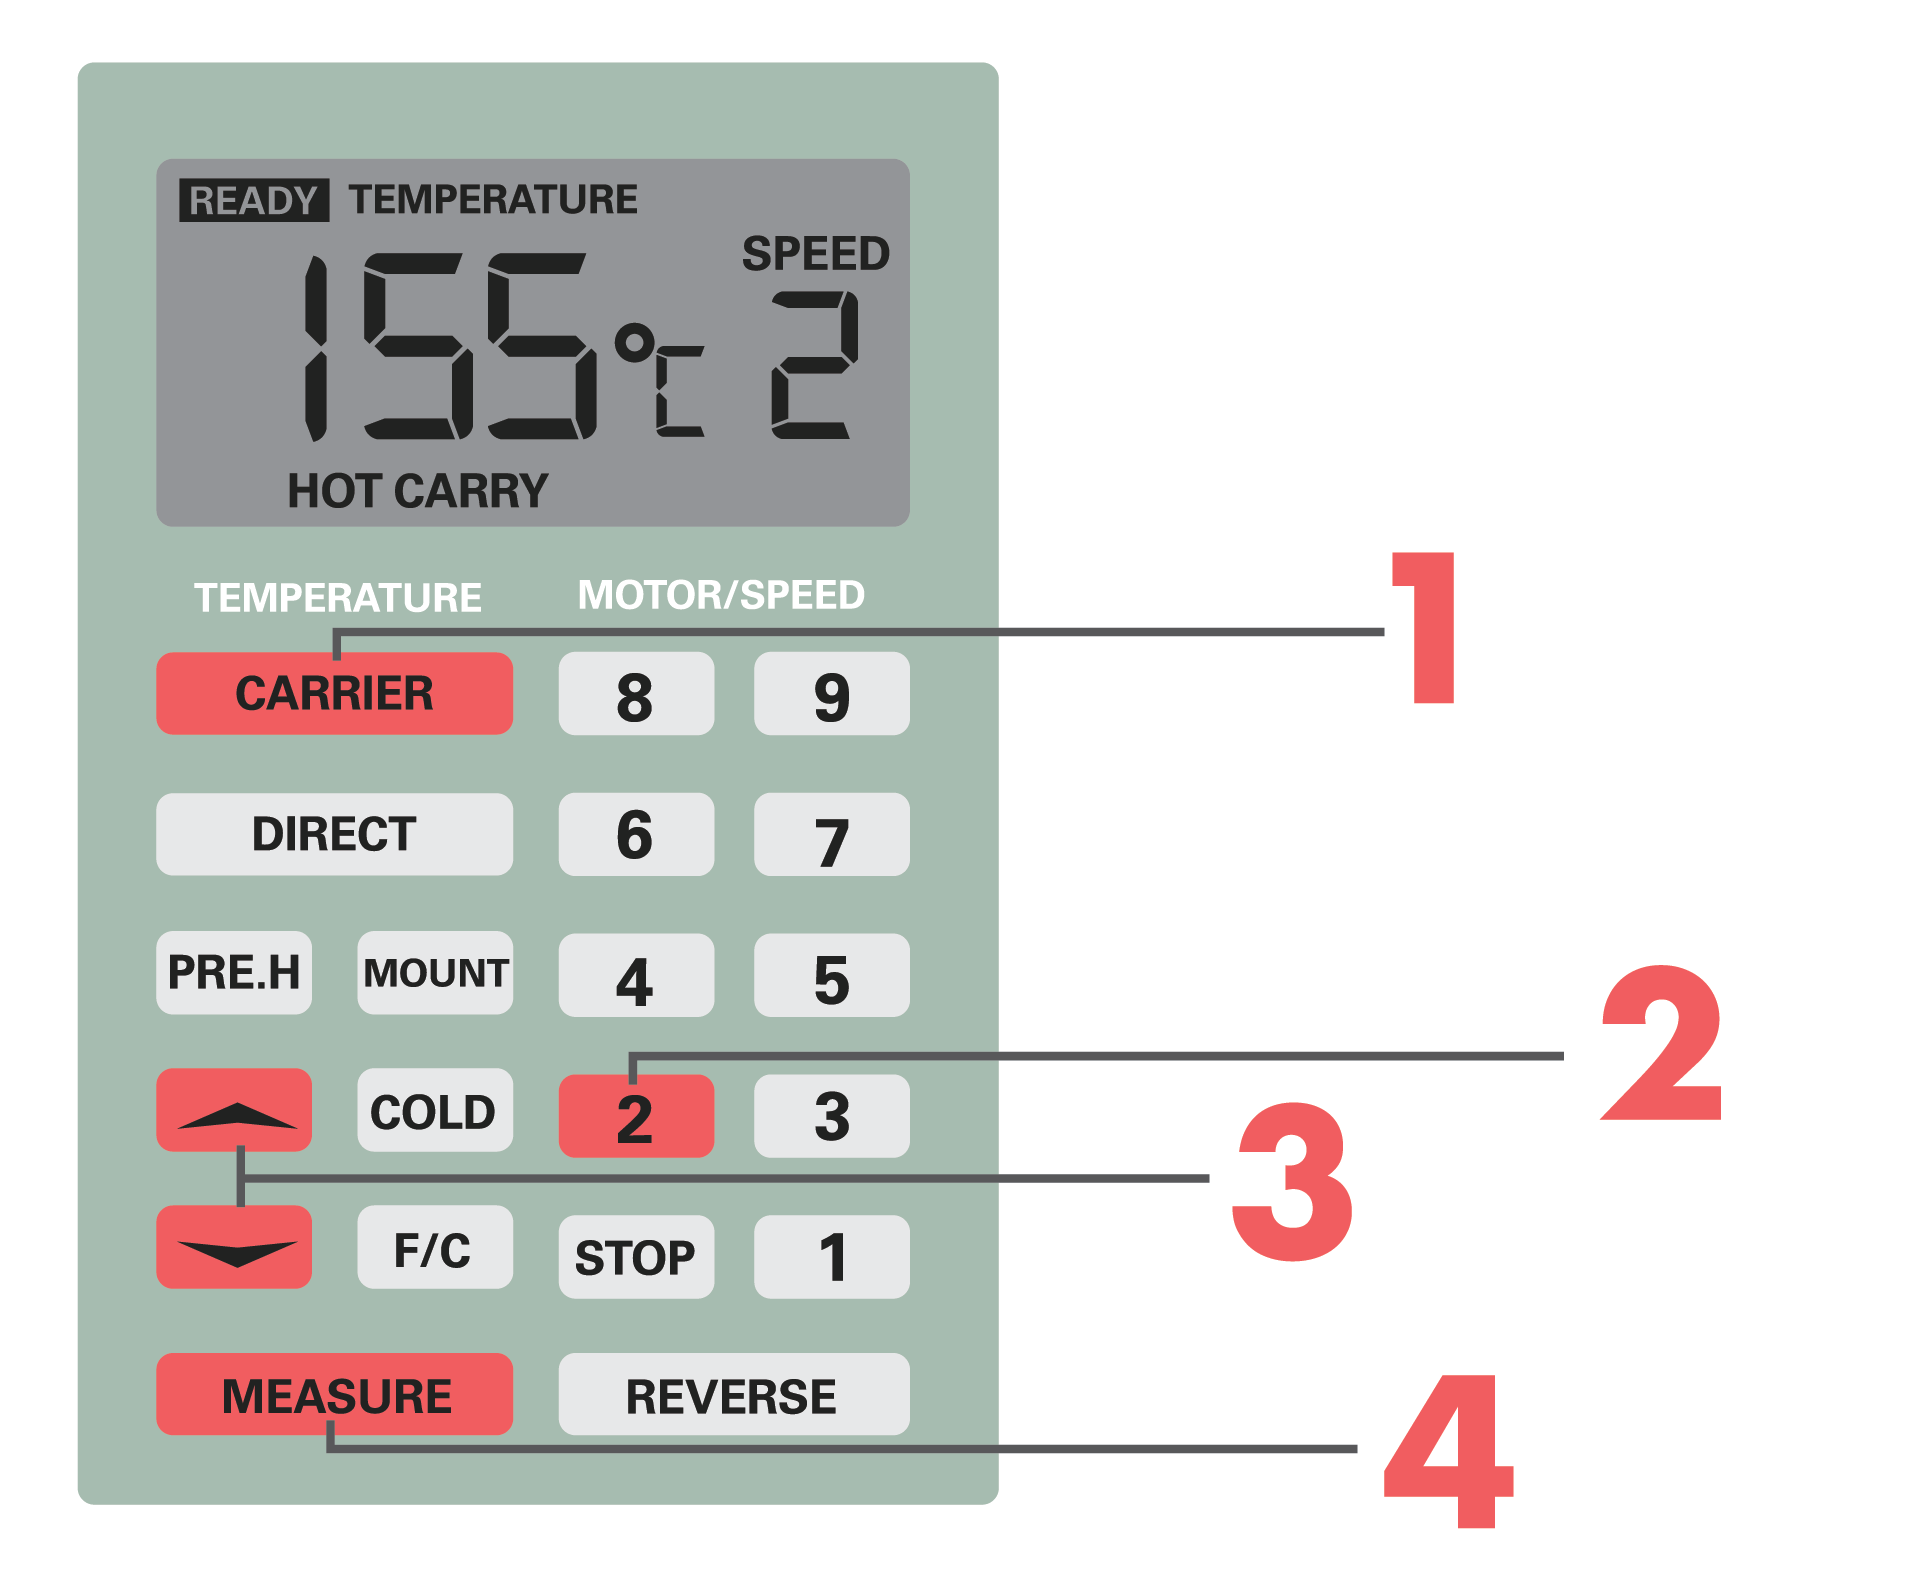
1 Press the 'Carrier' button
2 Set Speed to 2 by pressing '2'
3 Set the Temperature to 155ºc using the arrows
4 You can check the current temperature by holding 'Measure' It usually takes 5-10 mins to get itself up to temperature
Step 2 - Foiling your Artwork
Once the machine is up to temperature, you are now ready to foil your printed artwork.
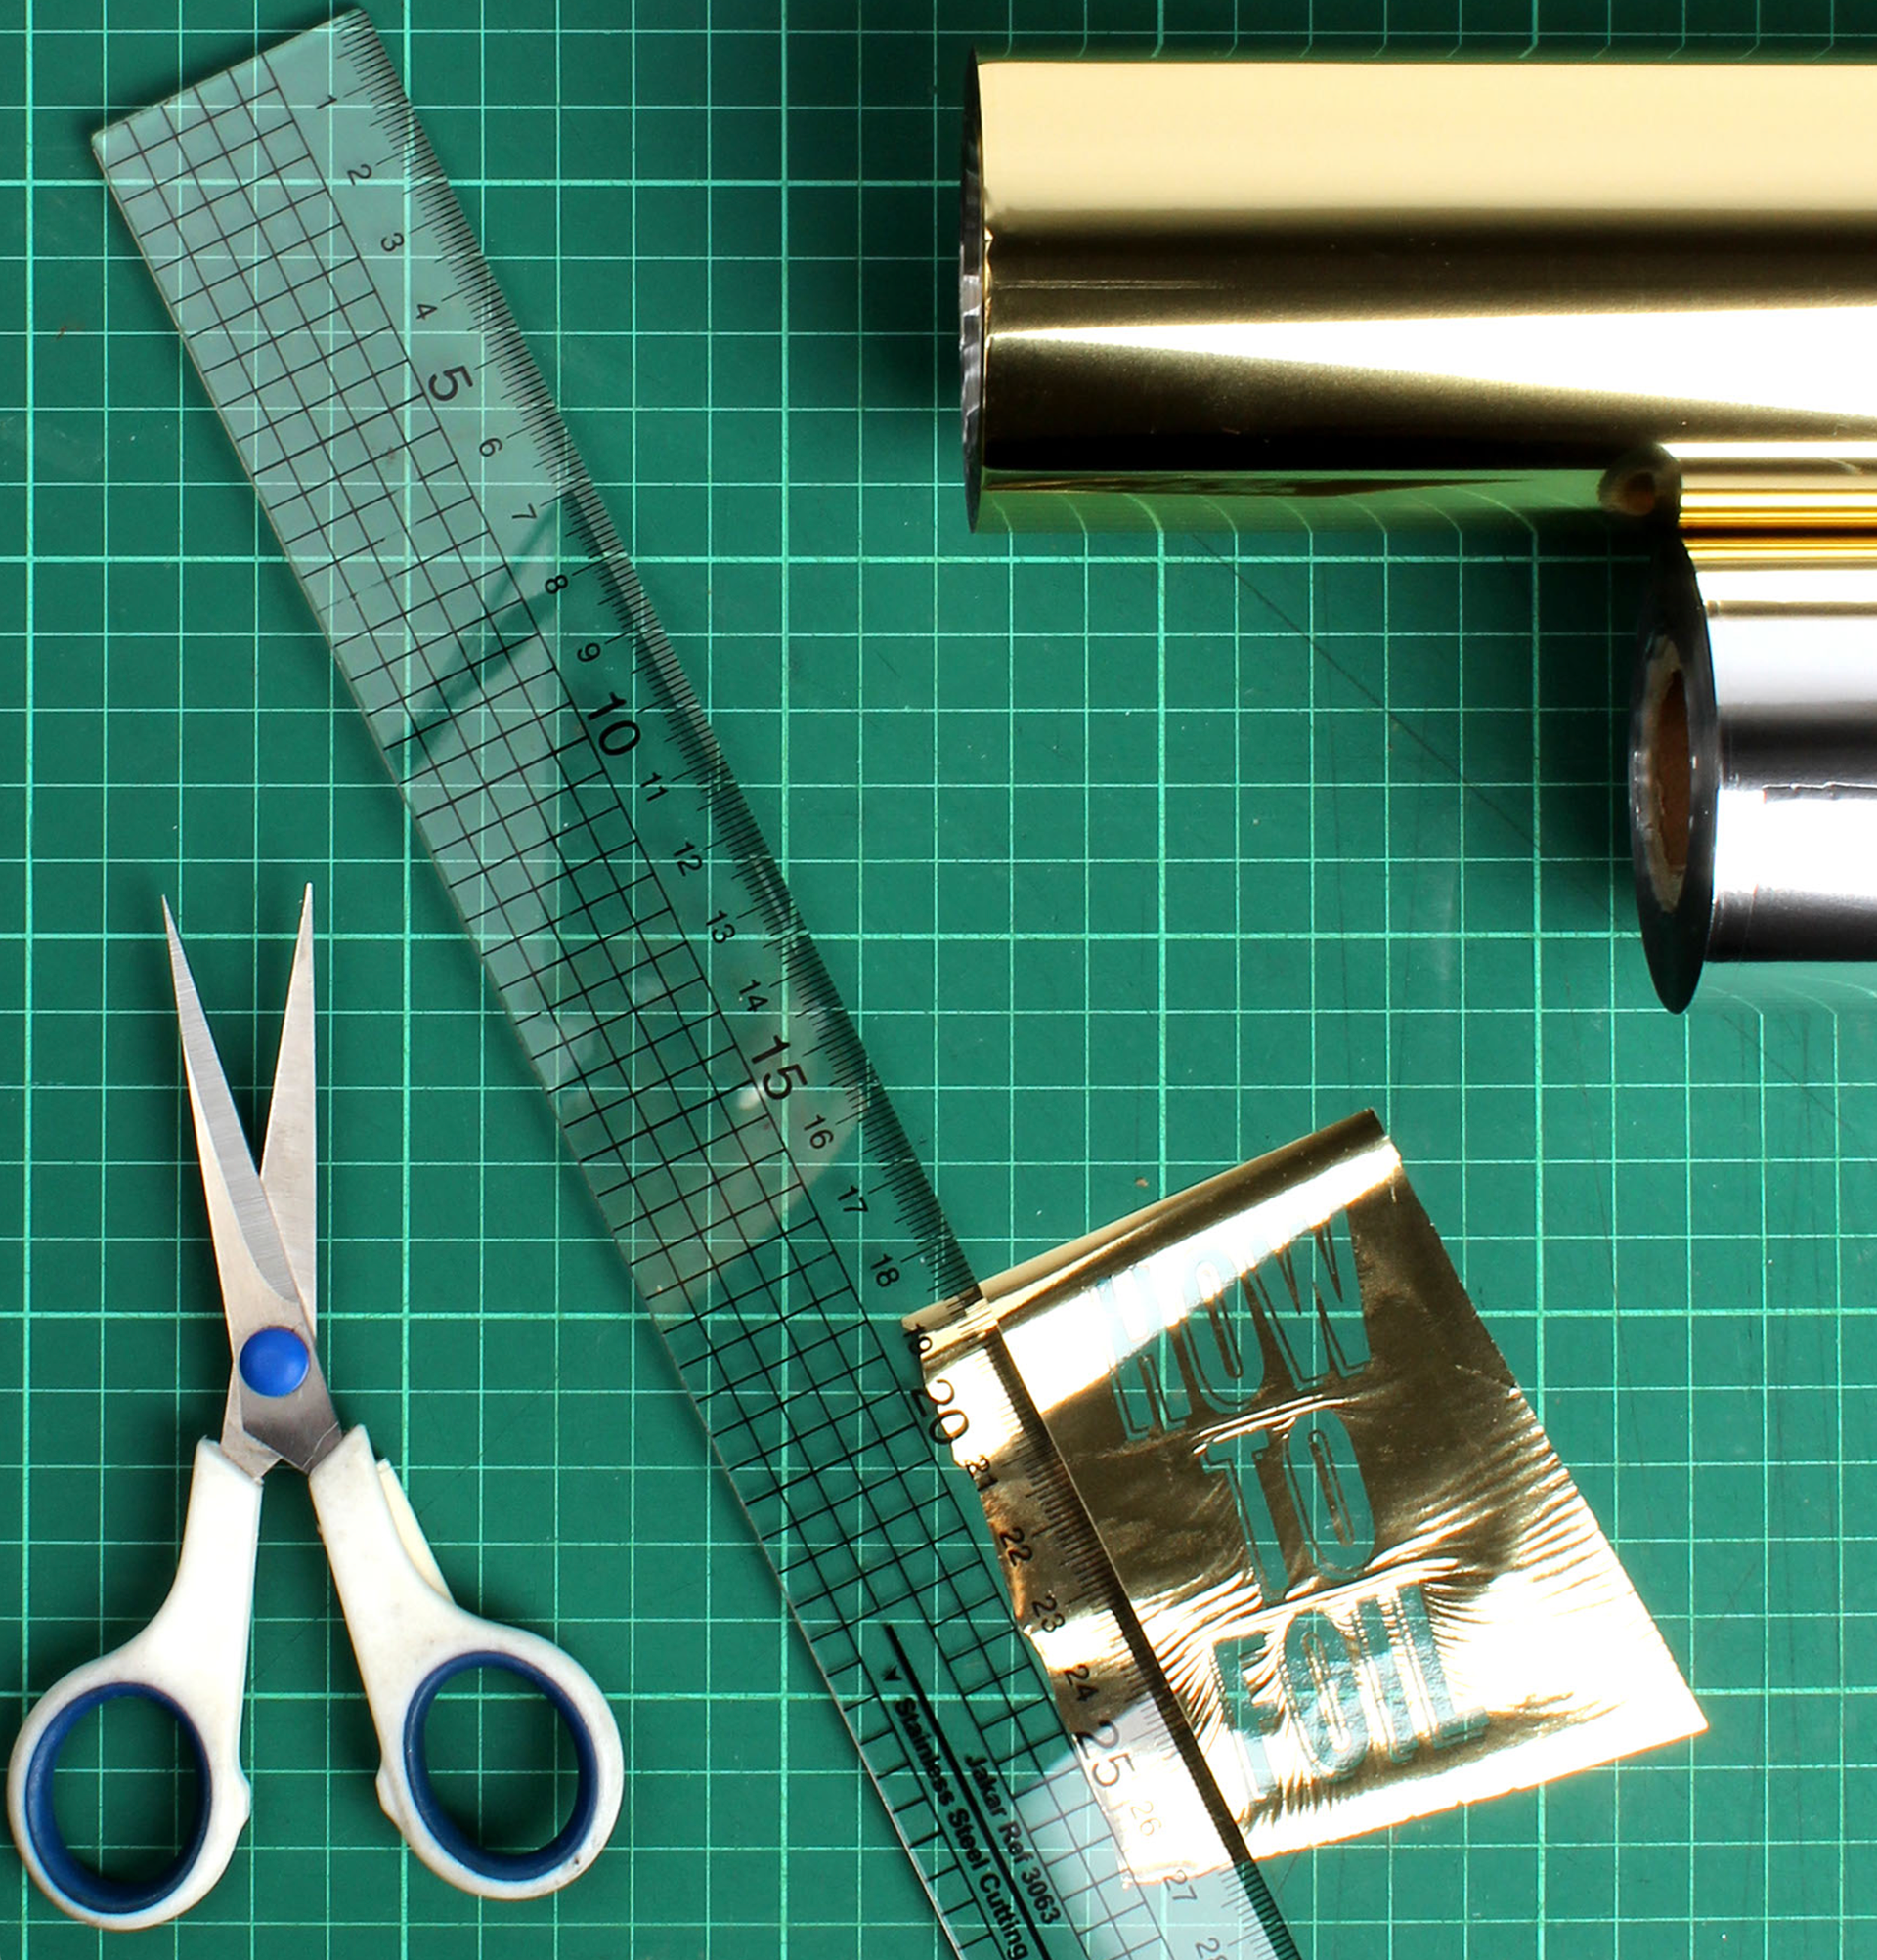
1 Cut your chosen colour foil from the roll, enough to cover the size of the design you wish to foil
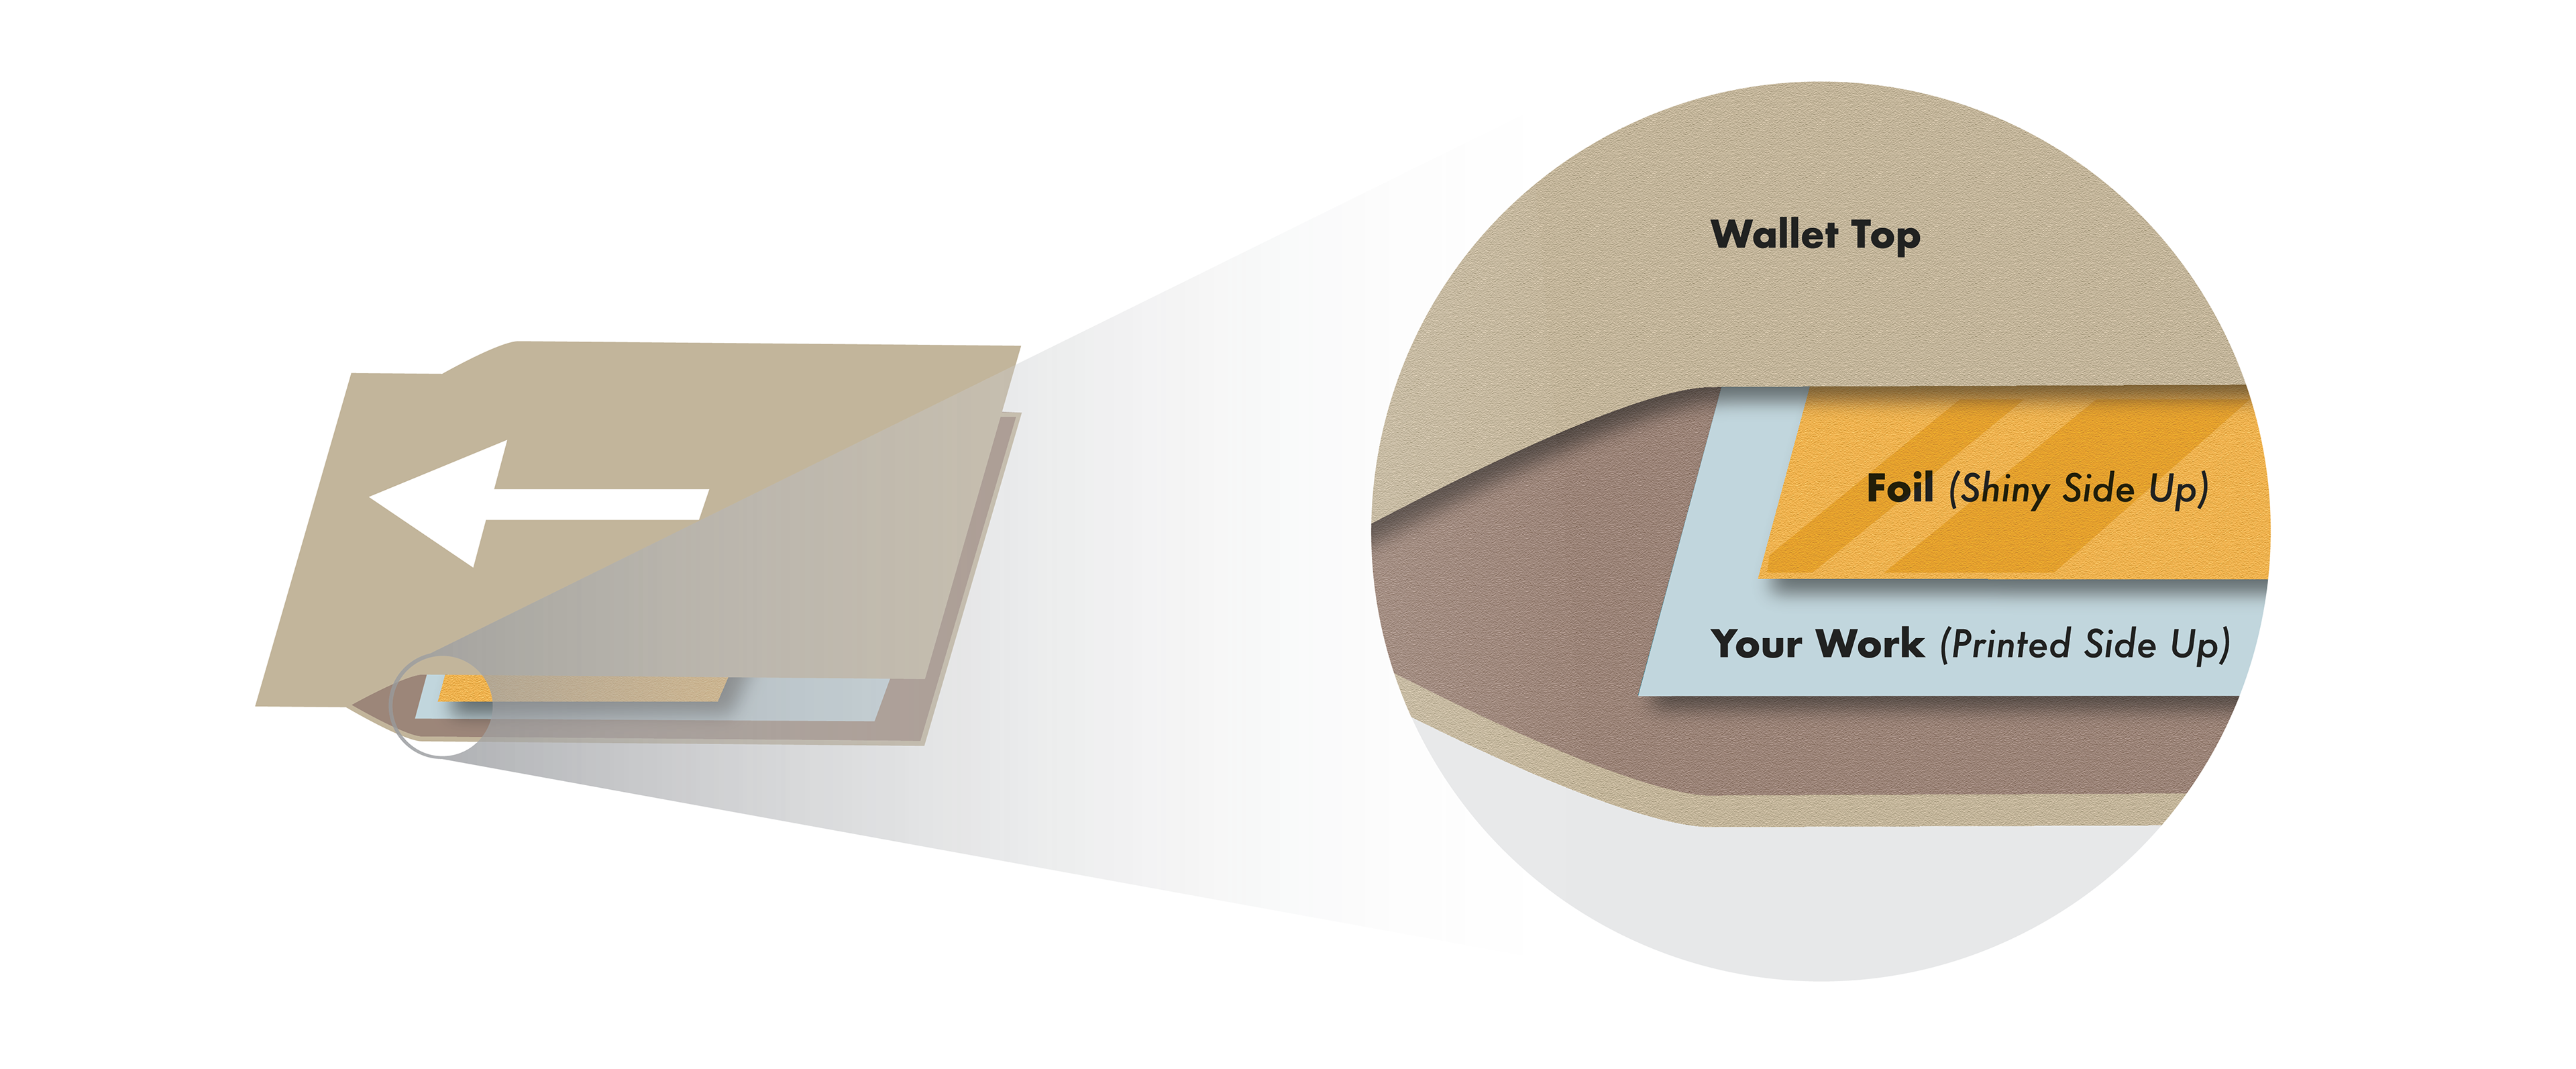
2 Place the foil, 'Shiny side up' on top of your artwork
3 Now place the artwork and foil inside the brown 'Foiling Sleeve'
4 Feed the sleeve containing your artwork and foil SEALED END FIRST into the Foiler and allow it to be pulled gently from your hands
5 Finally, open the wallet and peel off the foil, the foil should peel away leaving only your laser printed section foiled. revealing your shiny artwork!
Step 3 - Tidy up
Finally, when you have finished using the Foiler
1 Tidy away the foils and scissors to where they belong
2 Bin any small scraps and save the negative (the foil you peeled off) for your sketch book
3 If you are the last person using the foiler please POWER OFF